Bird Cam
Fall 2023 ECE 5725 Final Project
By Bhadra Bejoy (bb584) & Michael Awad (mja283)
Demonstration Video
Introduction
Inspired by our love of birds, for our final project, we decided to create a bird cam. This system consists of a Raspberry Pi 4, camera, microphone, motion detector, speaker, and a TFT screen. Our system is designed to be placed in a high bird traffic area such as by a bird feeder. The motion detector and the microphone wil pick up any disturbances in the area which will trigger the camera to take a picture. We then process the image to see if there is a human face in it. If it is not a face, we assume that the disturbance was caused by a bird, or another animal, and we record a video of it. If it is a face, we use the speaker and the TFT to try to get the human to leave the area. Additionally, we send text notifications of the disturbances to the user prompting them to access the local http server and view the image of the intruder or the video of the bird.
Project Objective:
- Detect when birds or humans are around.
- When a bird is around, notify the user and display a video.
- When a human is detected, try to get them to leave, and notify the user of the intruder.
Design & Testing
Hardware Design
Our hardware consisted of the Raspberry Pi 4, Pi Camera v2, Passive Infrared (PIR) sensor, Sound sensor (mic), speaker, TFT screen, and the box that housed these parts. The camera and the speaker were connected via the designated camera connector and audio jack on the Pi respectively. The PIR and mic were connected to GPIO pins and 5V power. We also had a portable power bank that was being used to power the Pi. To construct the physical product we used a box, cut holes in it for each of the hardware peripherals, and used tape to secure them.
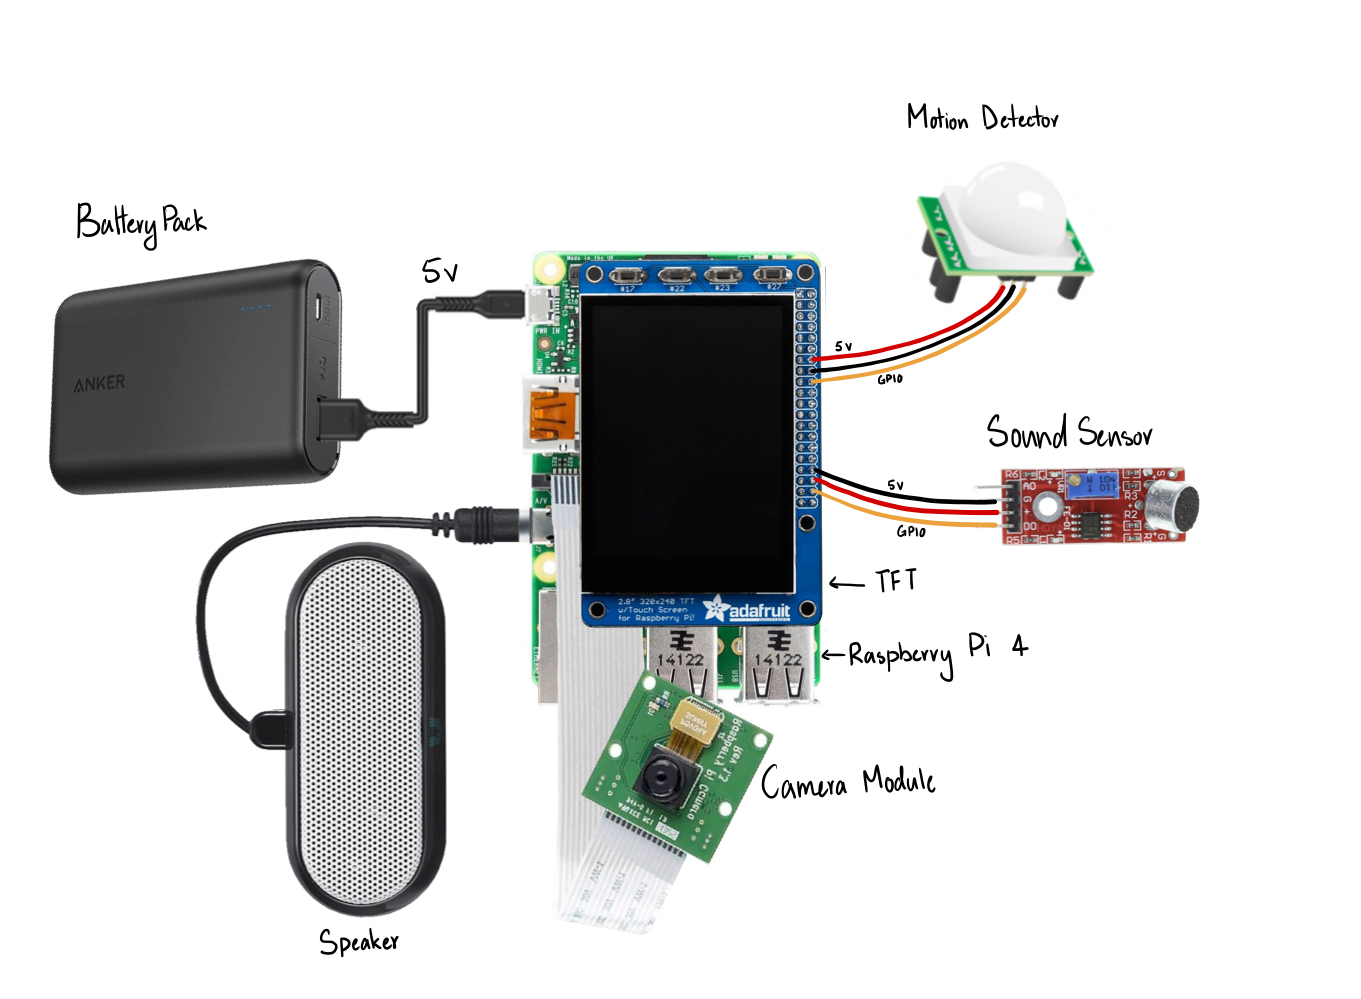
Hardware Connections
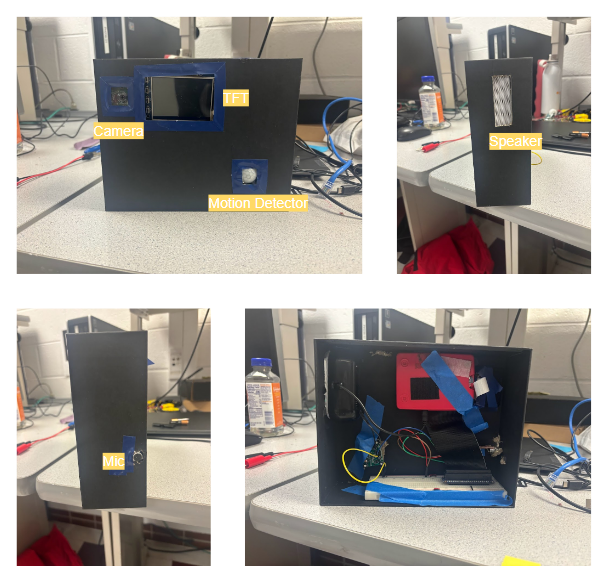
Bird Cam Box
Software Design
High-level overview
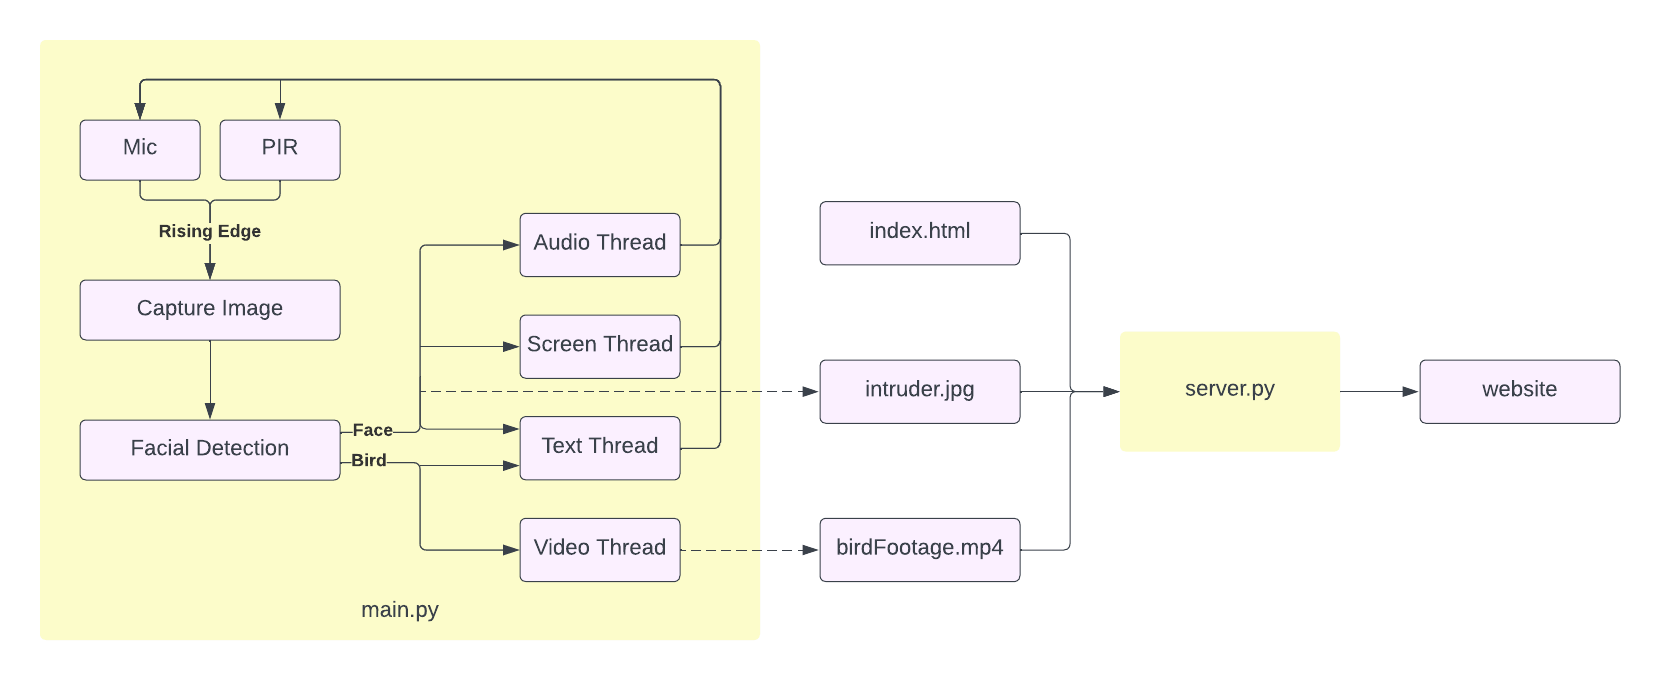
Our software consists of three python scripts and an html file.
main.py is the script that deals with our hardware and the image processing. It has interrupts for the mic and PIR which triggers the control function that takes an image then performs facial detection. If a face is detected, it saves a file "intruder.jpg" to the directory that contains a picture of the intruder, plays an alarm sound through the speaker, and display "You are being watched" on the TFT. If a face is not detected, we assume it is a bird and take a video of it, we save this video to "birdFootage.mp4". We also send text notifications to the user when a bird or intruder is spotted.
server.py creates and runs a local http server using index.html that displays intruder.jpg and birdFootage.mp4.
Software Design
Unit Testing
Before we created our main script, we wrote several separate scripts to unit test each peripheral and software block before integrating them.
We initialized the mic and first just polled it to make sure we were getting accurate readings, we also used this polling to tune the potentiometer on our sensor to set it to the right level of sensitivity. We then did the same thing with the PIR. These were both simple digital sensors and we just had to read the GPIO pin they were connected to.
We then initialized and setup the Pi camera following the instructions from the the Raspberry Pi website. We tested that we could take pictures and record videos using it.
The next step was testing that we could play audio using pygame, we downloaded a .wav file from the internet and used the pygame documentation to figure out how to output the sound from the speaker.
We then implemented and tested the text notifications. After some research, we found 'sinch' to be the best platform for our needs and we followed the developer documentation on their website to install the necessary packages and write the code. We tested that we were able to send custom text messages.
The last step in our unit testing was the facial detection. Our initial plan was to detect birds. We wanted to use a haar cascade classifier because from our research we found it to be one of the most efficient and low latency detection models to run on the Pi. We needed this low latency as we need to the detection in realtime. We tested some pre-trained models we found online but none of them were performing well so we decided to train our on model. This model performed even worse and we did not have the resources to train a more aggressive model so we decided to pivot our approach. We decided to use a pre-trained facial recognition model that worked very well and pivot to recognizing 'not birds' instead of birds. We used OpenCV and followed the instructions on the canvas page to install it. We then used OpenCV documentation to learn how to use the model. In order to test it we integrated the camera code so we could do real time processing.
main.py
Once we finished the unit testing we started integrating all the components into our main script.
We first setup interrupts for the PIR and mic, we assigned the same callback function 'mainFunc' to both of them. The interrupts are triggered on the rising edge (motion or sound is detected when a 1 is read on the GPIO pin). We also set the bounce time to be 10s as we thought that any disturbances that occurs within 10s of each other are most likely triggered by the same thing.
We then created threads for the text notification, audio, video recording, and the TFT screen display.
The audio thread uses pygame.mixer.Sound() to load in a .wav file to a pygame sound object and then plays the object.
The TFT screen thread displays a red screen and the text "YOU ARE BEING WATCHED". A dictionary that contains coordinates as keys and the text as values is used to set the positions of each line of the text on the screen. A for loop goes through the dictionary, renders the text and creates the rects for each line. screen.blit is then used to display the text on the screen. A non-blocking delay (uses time elapsed) is used to keep the screen on for 5 seconds before clearing it by filling it with black.
The video thread first makes the TFT screen green so we know that recording is happening. We then set up the camera and the associated properties. We record a .h264 video and save it to birdFootage.h264. The same non blocking delay is used to record for 20 seconds. We then convert the .h264 file to a .mp4. This is done using the subprocess module and the MP4Box command. This command caused some issues with our script as it took a long time and was blocking. We researched some alternative functions to perform the conversion but none of them alleviated the issue. So we decided that the best approach was to simply shorten the amount of time that the conversion takes. We did this by reducing the framerate to 10. This reduced the processing time significantly (to just about 3 seconds from the previous ~30) at the cost of our video being sped up about 4 times. The video was still very viewable and we felt like this tradeoff was reasonable. Another issue we ran into was when we had our server up and displayed the .mp4 file, it sometimes displayed the previous video file because of the processing delay of main.py and server.py. To eliminate this from happening, every time we ran the video thread, we first deleted the existing .mp4 file if one existed. Once the recording and conversion were completed, we cleared the TFT screen.
The text thread uses the Sinch SDK to send text messages. We had to set up an account on the Sinch website where we received some ID numbers that we used in the Client() function (found in the SDK documentation) to set up the client information. We then used the send sms function to send the text. We stored the text we wanted to send in a global variable "textMessage".
The next step was writing mainFunc. This function first sets up the camera, takes an image, and saves it to capture.jpg. We then use openCV to to read the image and convert it to gray scale to reduce processing time. We use the cascade.detectMultiScale function to find faces in the image. This function takes in parameters 'scaleFactor', 'minNeighbors', and 'minSize'. Since the model we used is very commonly used, we looked at other implementations of it to determine what parameters to use. We also set minSize to 25x25 which means that the detected face has to be at least 25px X 25px which, given the resolution of our camera, we found to be the most reasonable value. The coordinates of the detected objects are stored in 'objects'. These coordinates are used to draw rectangles over the faces in the image.
Once we run the facial detection we check if any objects are detected by checking if 'objects' has values or is empty. If it has values, we know that a face was detected. We then write the image with the rectangles drawn over it to intruder.jpg. We then set the textMessage to "THERE IS AN INTRUDER" and started the text thread, audio thread, and screen thread. If 'objects' was empty, we assume there are birds so we set the textMessage to "Birds Spotted!" and start the text thread and video thread.
Finally we initialized button 27 on the TFT to be the quit button. We set up a callback for it that cleans up the GPIO pins and then calls sys.exit to cleanly leave the script.
Because of our unit testing we did not run into many issues.
server.py
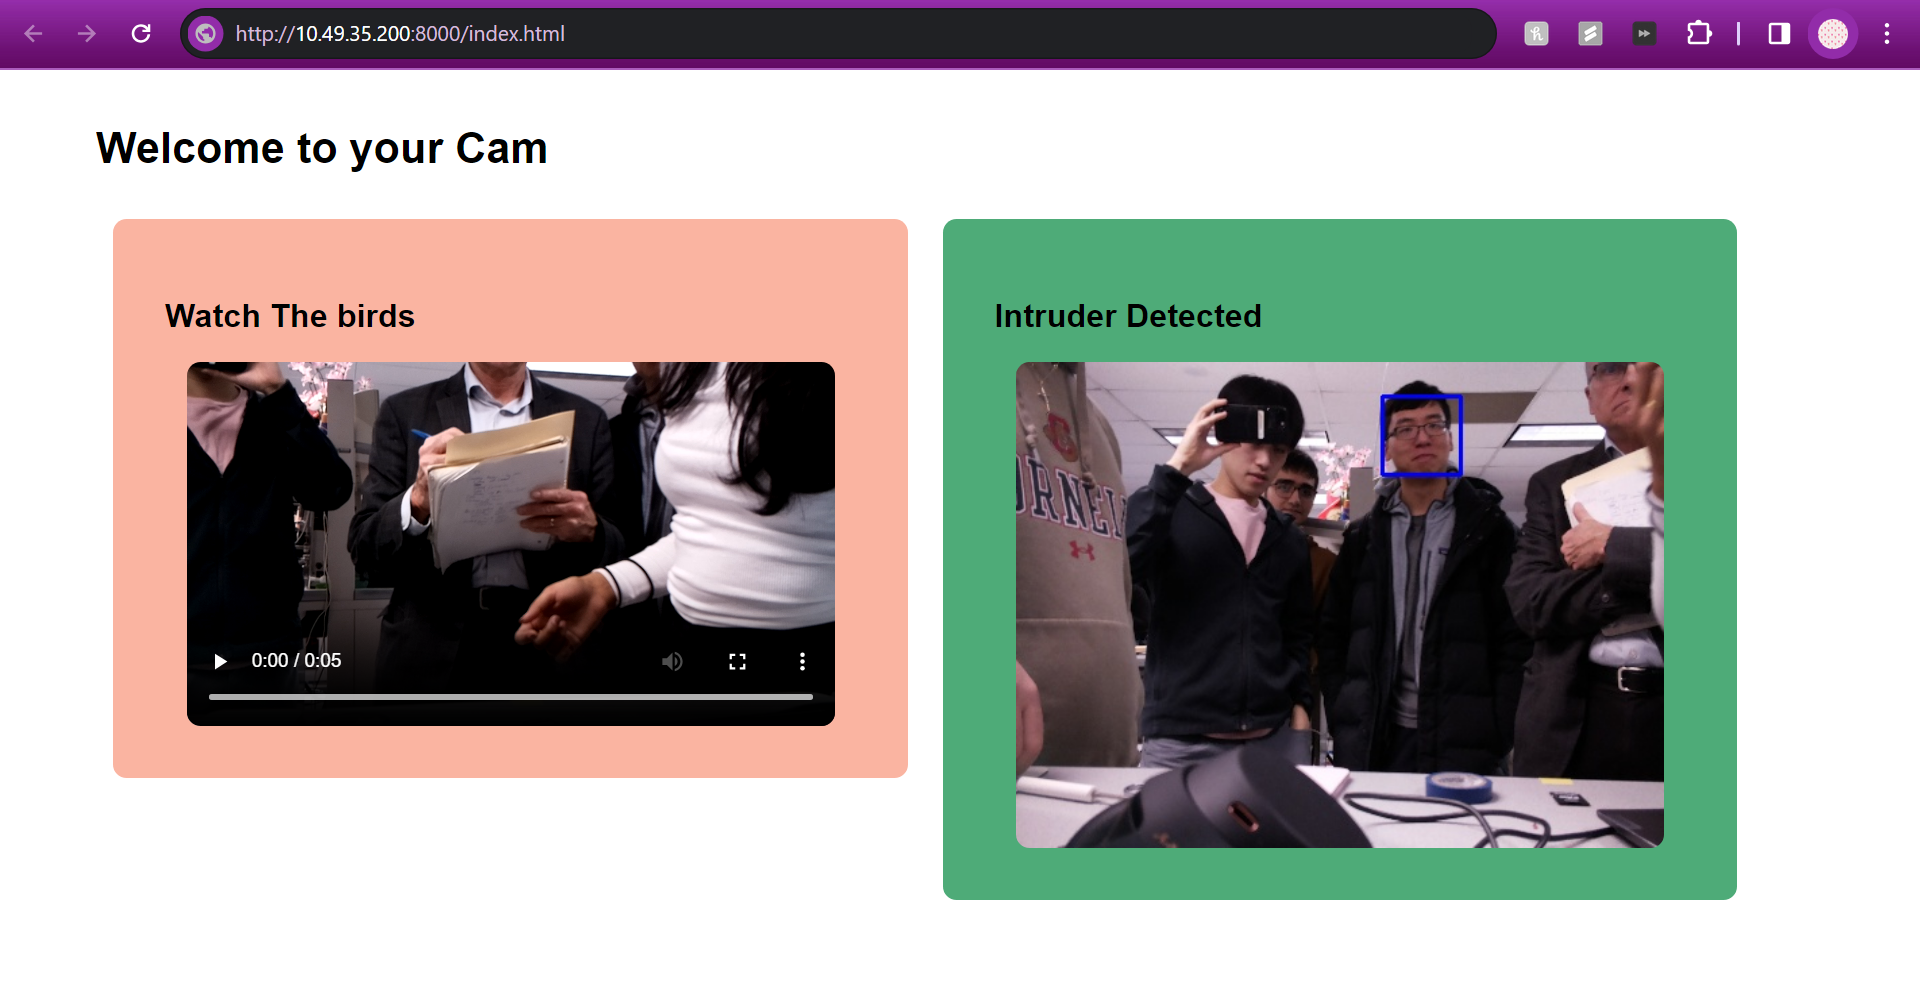
This script serves as a simple HTTP server to host an HTML file (index.html). It utilizes the http.server and socketserver modules to create a basic web server. The server runs on port 8000, and it serves files from the specified directory (/home/pi/FinalProject/). The index.html file in this directory is served when clients access the server. The server continues to run indefinitely until manually keyboard interrupt or the quit button is pressed, which is implemented in the same way as in main.py. The server is then accessed using the wlan0 broadcast address of the Pi and the port in a browser that is connected to the same wifi as the Pi.
index.html
shutdown.py
This Python script configures the Raspberry Pi to shut down when button 17 on the TFT is pressed. The script defines a function shutdown_raspberry_pi(channel) that is triggered when a falling edge is detected. The function cleans up GPIO settings, and then initiates a system shutdown using the subprocess module to run the "sudo shutdown -h now" command. The script continuously runs a loop (while 1: pass) to keep the program alive. This ensures that the script is always monitoring the button state for a potential shutdown event.
main_bash.sh
This bash script runs main.py and server.py in the background and shutdown.py in the foreground. This script was created so that all three python scripts could be called at once at startup. In crontab we configured this script to be called at reboot. To test whether this script would work at reboot without having to keep rebooting the pi, we ran the script from a temporary directory /home/pi/tmp. When running it from there, we noticed a lot of issue because we had a lot of relative paths in our scripts. We had to go back through all our scripts and make any paths absolute. Once everything was working as expected in /tmp we rebooted the pi and confirmed that everything worked as expected.
Results
Ultimately, the project did perform as we expected for the demo. The project successfully detects both birds and intruders, and keeps the user informed about the findings via both web server and text message notifications. There were some goals that were tweaked as the project progressed. For example, originally the project was set out to play a sound to scare squirrels away but that changed from squirrels to humans. Additionally, we wanted to record a longer video to load onto the server but due to camera constraints, we were not able to do that. All in all, we consider the project to be an incredible success.
Conclusions
Our BirdCam successfully notified the user if there was an intruder by sending a text message to the owner, as well as updating the server to display the intruder’s face, and displaying a message to the intruder via the piTFT. Additionally, if there was a bird detected, we successfully recorded a video, displayed the video of the bird on the server, and sent a text message to the user alerting them that there were birds detected. We did however, want to have a full live stream of the BirdCam running on the server. This idea was put aside because we couldn’t have taken pictures using the camera whilst the camera was being used for a livestream. Additionally, our original model that was trained to detect bird images did not work as expected. We have attributed this to us using cut out bird images rather than real birds as our positive cases and not having the processing capabilities to train a model. However, due to resource and time constraints, we opted to pivot from this idea.
Future Work
There would be several additions to the project if we had more time. The first being, we would have added a second Pi Camera that would’ve just been responsible for livestreaming the BirdCam. This way, if our user wanted to bird watch throughout the day, they would be able to. Additionally, we would have liked to include a bird identification process as well. Ideally, after collecting the video of the bird, we would be able to identify what kind of bird it is and let the user know. Lastly, we would have wanted to store the history of both birds and intruders for the user to be able to look back at if needed.
The Team
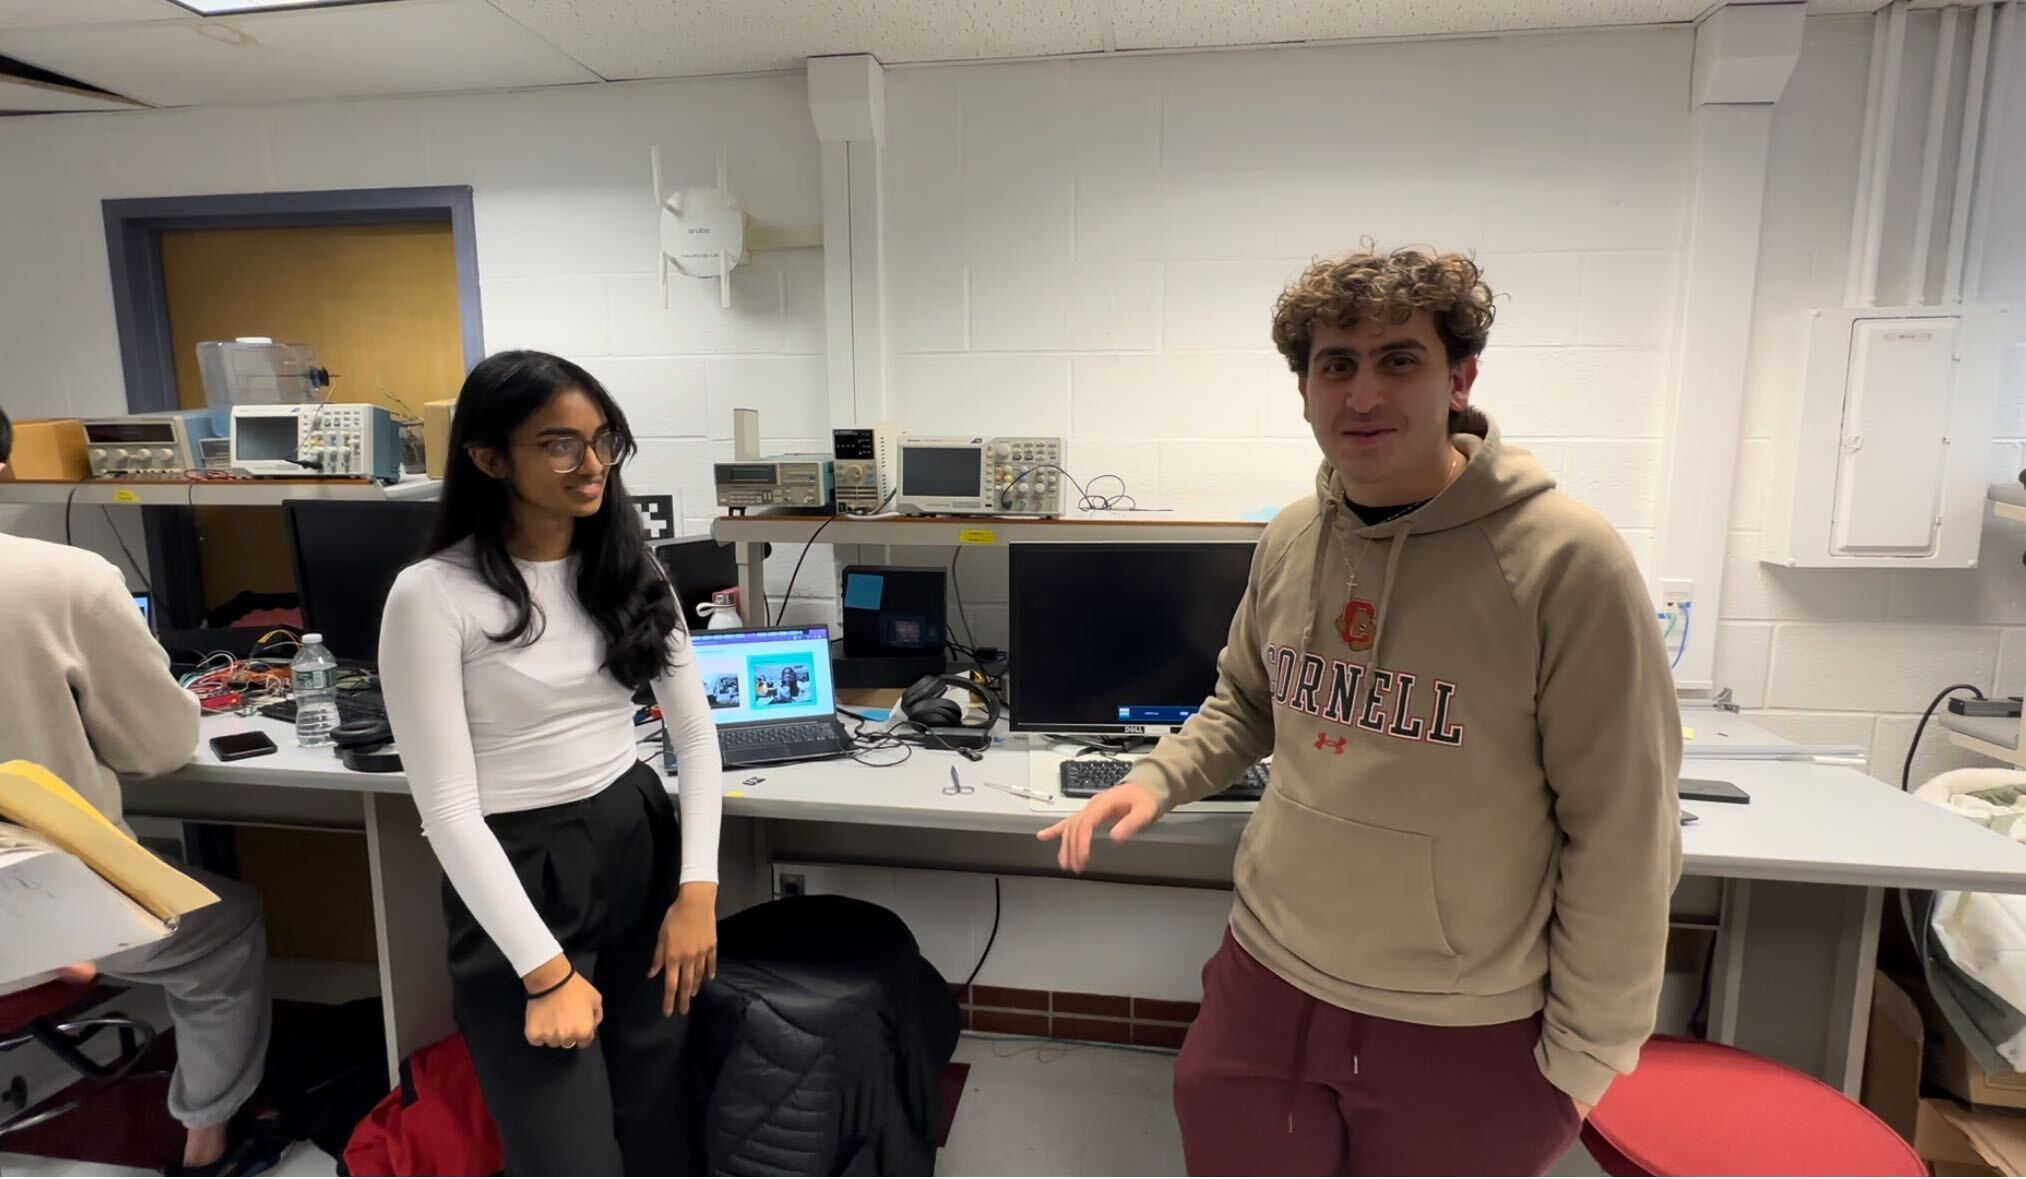
Project group picture
Michael Awad
mja283@cornell.edu
Software for camera, text messages, and shutdown

Bhadra Bejoy
bb584@cornell.edu
Software for image detection, sensors, server, and control logic. And hardware implementation
Although both of us took the lead on on separate aspects of the project, we were working together the whole time as every aspect utilized a lot of integration.
Parts List
| Part | Cost |
|---|---|
| Raspberry Pi | Provided |
| Raspberry Pi Camera V2 | Provided |
| Adafruit PiTFT Plus 320x240 2.8" TFT + Capacitive Touchscreen | Provided |
| Passive Infrared Sensor | Provided |
| Power Bank | Provided |
| Sound Sensor | $1.20 |
| Speaker $5.99 | $5.99 |
| Sinch API Text Service | $10.00 |
| Jumpers and breadboard | Provided |
| Cardboard Box | Recycled |
Total: $17.19
References
PiCamera DocumentPigpio Library
R-Pi GPIO Document
R-Pi OpenCV Install
Alarm Audio
pygame Documentation
OpenCV Haar Cascade usage
Facial Haar Cascade File
Sinch SDK Documentation
HTTP Server Module
Socket Server Module
Code Appendix
main.py
                # Deals with the hardware and image processing.
                # Accepts input from microphone, camera, and PIR sensor
                # Outputs are the piTFT and a speaker
                # Performs facial detection


                # Imports
                from picamera import PiCamera
                from sinch import Client
                import pygame
                from pygame.locals import *
                from time import sleep, perf_counter
                import RPi.GPIO as GPIO
                import cv2
                import subprocess
                import threading
                import os
                import sys
                import asyncio

                os.putenv("SDL_VIDEODRIVER", "fbcon")  # Display on piTFT
                os.putenv("SDL_FBDEV", "/dev/fb0")

                GPIO.setmode(GPIO.BCM)

                # Load the Haar Cascade model for Facial Recognition
                cascade_path = "/home/pi/FinalProject/haarcascade_frontalface_default.xml"
                cascade = cv2.CascadeClassifier(cascade_path)

                # Setup pygame
                pygame.init()
                pygame.mixer.init()
                pygame.mouse.set_visible(False)
                WHITE = 255, 255, 255
                GREEN = 0, 255, 0
                RED = 255, 0, 0
                BLACK = 0, 0, 0
                screen = pygame.display.set_mode((320, 240))
                my_font = pygame.font.Font(None, 40)


                # indication that script has started
                screen.fill(WHITE)
                pygame.display.flip()

                # Quit
                QUIT = 27
                GPIO.setup(QUIT, GPIO.IN, pull_up_down=GPIO.PUD_UP)


                def quit_callback(channel):
                    print("Quiting main.py")
                    GPIO.cleanup()
                    sys.exit()


                GPIO.add_event_detect(QUIT, GPIO.FALLING, callback=quit_callback, bouncetime=200)


                # Non blocking delay
                def wait(duration):
                    start_time = perf_counter()
                    while perf_counter() - start_time < duration:
                        pass


                # Play intruder audio
                def playAudio():
                    print("Playing Audio")
                    my_sound = pygame.mixer.Sound("/home/pi/FinalProject/mixkit-classic-alarm-995.wav")
                    my_sound.play()
                    print("Audio Done")


                # Send notification text
                textMessage = "Hello"


                def sendText():
                    print("Sending Text")
                    sinch_client = Client(
                        key_id="a9d15ba9-8908-41cd-a7a3-67b92e8dcd0b",
                        key_secret="eaOamzsb.Z_tgcFprtWrPV1HHM",
                        project_id="4352df9e-4a64-4fb0-b14c-f4bbcbb67230",
                    )
                    send_batch_response = sinch_client.sms.batches.send(
                        body=textMessage,
                        to=["OURPHONE#"],  # Ommitted for privacy
                        from_="12064743845",
                        delivery_report="none",
                    )
                    print("Text done")


                # Record bird footage
                def recordVideo():
                    print("Recording")
                    # Some errors encountered when writing to the file when it already exists, removing it first in that case
                    if os.path.exists("/home/pi/FinalProject/bird_footage.mp4"):
                        os.remove("/home/pi/FinalProject/bird_footage.mp4")
                    # Indicate that we are recording
                    screen.fill(GREEN)
                    pygame.display.flip()
                    vcamera = PiCamera()
                    vcamera.framerate = 15
                    vcamera.rotation = 270
                    vcamera.start_recording("/home/pi/FinalProject/bird_footage.h264")
                    wait(20)
                    vcamera.stop_recording()
                    vcamera.close()
                    print("Recording Done")
                    # Convert .h264 to .mp4
                    subprocess.run(
                        [
                            "MP4Box",
                            "-add",
                            "/home/pi/FinalProject/bird_footage.h264",
                            "/home/pi/FinalProject/bird_footage.mp4",
                        ]
                    )
                    print("Conversion Done")
                    screen.fill(BLACK)
                    pygame.display.flip()


                # Display intruder text
                def displayScreen():
                    screen.fill(RED)
                    displayText = {(160, 80): "YOU ARE", (160, 120): "BEING", (160, 160): "WATCHED"}
                    for text_pos, my_text in displayText.items():
                        text_surface = my_font.render(my_text, True, WHITE)
                        rect = text_surface.get_rect(center=text_pos)
                        screen.blit(text_surface, rect)
                    pygame.display.flip()
                    print("Screen Done")


                textThread = threading.Thread(target=sendText)
                audioThread = threading.Thread(target=playAudio)
                videoThread = threading.Thread(target=recordVideo)
                screenThread = threading.Thread(target=displayScreen)


                # Motion or sound detected
                def mainFunc(channel):
                    global textMessage
                    print("In callback")
                    # Setup camera
                    camera = PiCamera()
                    camera.resolution = (480, 360)
                    camera.framerate = 15
                    camera.rotation = 270
                    # Take picture
                    camera.capture("/home/pi/FinalProject/capture.jpg")
                    camera.close()
                    # Open image and process with cv2
                    img = cv2.imread("/home/pi/FinalProject/capture.jpg")
                    gray = cv2.cvtColor(img, cv2.COLOR_BGR2GRAY)
                    objects = cascade.detectMultiScale(
                        gray, scaleFactor=1.1, minNeighbors=10, minSize=(25, 25)
                    )
                    # Draw rectangle over detected objects
                    for x, y, w, h in objects:
                        cv2.rectangle(img, (x, y), (x + w, y + h), (255, 0, 0), 2)

                    global textThread
                    textThread = threading.Thread(target=sendText)

                    # If a face was detected
                    if len(objects) > 0:
                        # Create file detected.jpg with rectangle drawn on face
                        cv2.imwrite("/home/pi/FinalProject/detected.jpg", img)
                        print("Intruder Detected")
                        # Set text for notification
                        textMessage = "THERE IS AN INTRUDER"
                        global audioThread
                        global screenThread
                        # Play alarm sound
                        audioThread = threading.Thread(target=playAudio)
                        audioThread.start()
                        # Display "YOU ARE BEING WATCHED" on tft
                        screenThread = threading.Thread(target=displayScreen)
                        screenThread.start()
                        try:
                            audioThread.join()
                            screenThread.join()
                            # To display screen for 5s
                            wait(5)
                            # Clear screen
                            screen.fill(BLACK)
                            pygame.display.flip()
                        except KeyboardInterrupt:
                            GPIO.cleanup()
                            quit()
                    # If face not detected, assume bird
                    else:
                        print("Bird Detected")
                        # Set text for notification
                        textMessage = "Birds Spotted!"
                        global videoThread
                        # Record video
                        videoThread = threading.Thread(target=recordVideo)
                        videoThread.start()
                        try:
                            videoThread.join()
                        except KeyboardInterrupt:
                            GPIO.cleanup()
                            sys.exit()
                    # Send text
                    textThread.start()


                # Setup PIR
                pir = 4
                GPIO.setup(pir, GPIO.IN, pull_up_down=GPIO.PUD_UP)

                # Setup microphone
                mic = 5
                GPIO.setup(mic, GPIO.IN, pull_up_down=GPIO.PUD_UP)

                # Add event detect for PIR and Mic
                GPIO.add_event_detect(pir, GPIO.RISING, callback=mainFunc, bouncetime=10000)
                GPIO.add_event_detect(mic, GPIO.RISING, callback=mainFunc, bouncetime=10000)


                pirValPrev = 1
                micValPrev = 1


                try:
                    # Using quit as flag for code run
                    while GPIO.input(QUIT):
                        # Print PIR or Mic if value changes
                        pirVal = GPIO.input(pir)
                        micVal = GPIO.input(mic)
                        if pirVal != pirValPrev:
                            print("PIR: " + str(pirVal))
                        if micVal != micValPrev:
                            print("MIC: " + str(micVal))
                        pirValPrev = pirVal
                        micValPrev = micVal

                except KeyboardInterrupt:
                    GPIO.cleanup()
                    sys.exit()
server.py
                #Host index.html file on a HTTP server

                import http.server
                import socketserver
                import RPi.GPIO as GPIO
                import sys
                import os

                # Quit
                QUIT = 27
                GPIO.setmode(GPIO.BCM)
                GPIO.setup(QUIT, GPIO.IN, pull_up_down=GPIO.PUD_UP)


                def quit_callback(channel):
                    print("Quitting Server")
                    GPIO.cleanup()
                    sys.exit()


                GPIO.add_event_detect(QUIT, GPIO.FALLING, callback=quit_callback, bouncetime=200)

                # Port for the HTTP server
                PORT = 8000

                #Directory to html file
                RELATIVE_DIRECTORY = "/home/pi/FinalProject/"
                HTML_FILE = "index.html"

                #Set as a absolute path to avoid linking errors in crontab
                DIRECTORY = os.path.abspath(RELATIVE_DIRECTORY)

                Handler = http.server.SimpleHTTPRequestHandler


                try:
                    #Create and run the HTTP server
                    with socketserver.TCPServer(("", PORT), Handler) as httpd:
                        print(f"Serving at port {PORT}")
                        print(f"Directory: {DIRECTORY}")
                        print(f"HTML File: {HTML_FILE}")
                        os.chdir(DIRECTORY)  # Change the current working directory to the absolute path
                        httpd.serve_forever()
                except KeyboardInterrupt:
                    GPIO.cleanup()
                    print("\nServer is shutting down.")
                    sys.exit()
shutdown.py
                # Shuts down pi when button connected to GPIO 17 is pressed

                import RPi.GPIO as GPIO
                import subprocess
                import threading
                import os
                import sys
                from time import sleep

                GPIO.setmode(GPIO.BCM)

                BUTTON_PIN = 17
                GPIO.setup(BUTTON_PIN, GPIO.IN, pull_up_down=GPIO.PUD_UP)


                def shutdown_raspberry_pi(channel):
                    print("Button pressed. Initiating shutdown...")
                    try:
                        GPIO.cleanup()
                        subprocess.run(["sudo", "shutdown", "-h", "now"])
                    except Exception as e:
                        print(f"An error occurred: {e}")


                GPIO.add_event_detect(
                    BUTTON_PIN, GPIO.FALLING, callback=shutdown_raspberry_pi, bouncetime=300
                )
                while 1:
                    pass
index.html
                <!DOCTYPE html>
                <html lang="en">
                <head>
                    <meta charset="UTF-8">
                    <meta name="viewport" content="width=device-width, initial-scale=1.0">
                    <title>Bird Cam</title>
                    <style>
                        body {
                            font-family: Arial, sans-serif;
                            margin: 0;
                            padding: 0;
                            text-align: center;
                        }

                        .container {
                            width: 90%;
                            margin: 0 auto;
                            text-align: left;
                            overflow: hidden;
                        }

                        h1 {
                            margin-top: 40px;
                        }

                        .column {
                            width: 40%;
                            float: left;
                            margin: 1%;
                            border-radius: 10px;
                            overflow: hidden;
                            padding: 3%;
                        }

                        .left-column {
                            background-color: rgb(250, 180, 161);
                        }

                        .right-column {
                            background-color: rgb(78, 171, 120);
                        }

                        .column img {
                            display: block;
                            margin: 0 auto;
                            border-radius: 10px 10px 10px 10px;
                        }

                        .column video {
                            display: block;
                            margin: 0 auto;
                            border-radius: 10px 10px 10px 10px;
                        }

                        ul {
                            list-style: none;
                            padding: 0;
                        }

                        li {
                            margin-bottom: 20px;
                            overflow: hidden;
                        }
                    </style>
                </head>
                <body>
                    <div class="container">
                        <h1>Welcome to your Bird Feeder</h1>

                        <div class="column left-column">
                            <h2>Watch The birds</h2>
                            <video width="480" controls autoplay>
                                <source src="bird_footage.mp4" type="video/mp4">
                                Your browser does not support the video tag.
                            </video>
                        </div>

                        <div class="column right-column">
                            <h2>Intruder Detected</h2>
                            <img src="detected.jpg" alt="Bird Image" width="480" height="360">
                        </div>
                    </div>
                </body>
                </html>